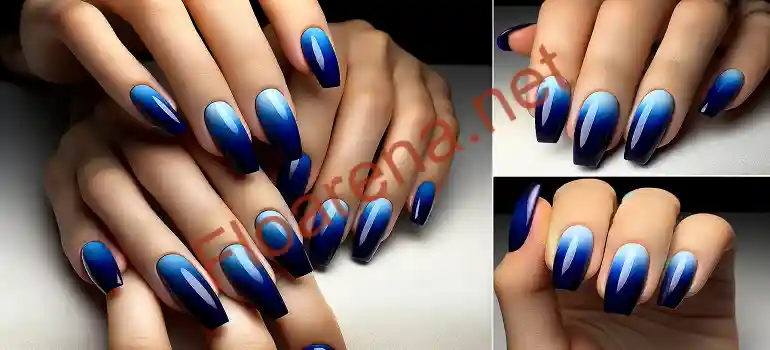
Royal Blue Ombre Nails are very popular today. They look beautiful and elegant. Many people love this nail style. The blue color changes slowly from light to dark. This creates a pretty effect on your nails.
These nails work for many events. You can wear them to work or parties. They look good with most outfits. Royal Blue Ombre Nails make your hands look pretty. They are not too hard to make at home.
The royal blue color is rich and deep. It looks like the ocean or night sky. When you make it ombre, it becomes even more special. Your nails will look like artwork.
What Are Royal Blue Ombre Nails?
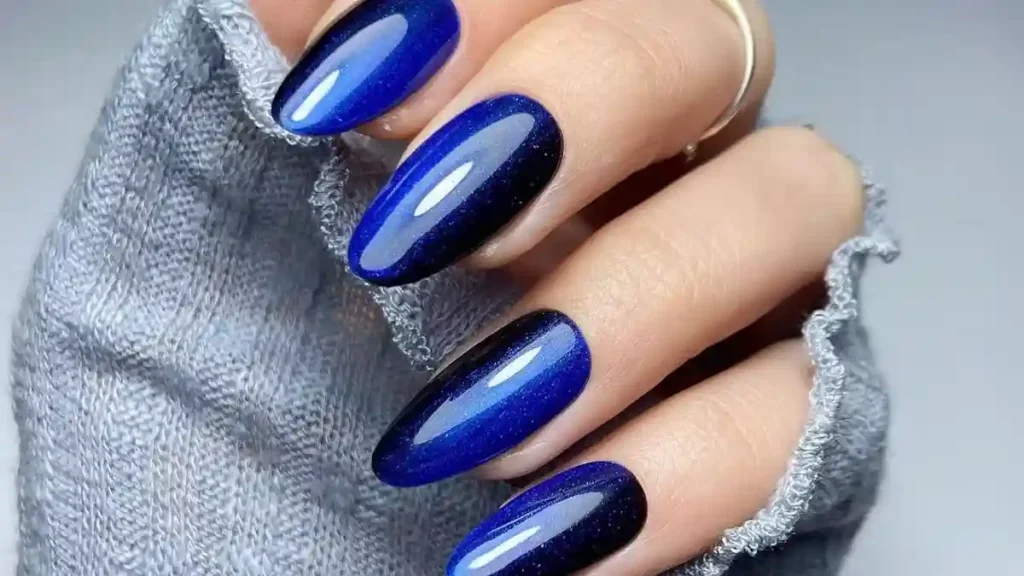
Royal Blue Ombre Nails have colors that blend together. The color starts light at the bottom. It gets darker as it goes up to the tip. The darkest part is royal blue.
This style uses different shades of blue. Some people add white or clear polish too. The key is smooth blending. No hard lines should show between colors.
Key Features:
- Colors blend smoothly from light to dark
- Royal blue is the main color
- No sharp lines between shades
- Works on short and long nails
- Looks good on all nail shapes
- Easy to match with clothes
- Gives a fancy look
Why Choose Royal Blue Ombre Nails?
These nails have many good points. They look classy and modern. Royal Blue Ombre Nails work for many people. They are not too bright or too dull.
Style Benefits:
- Always look fashionable
- Work for day and night events
- Make fingers look longer
- Go with many outfit colors
- Look good in photos
- Easy to dress up or down
- Give a polished appearance
Easy Care:
- Hide small mistakes well
- Last longer than plain colors
- Simple to fix at home
- Do not need daily touch-ups
- Work with different nail lengths
- Strong and durable when done right
Popular Royal Blue Ombre Nails Designs

Classic Blue Fade
This is the most common style. It starts with clear or light blue at the bottom. The color gets darker toward the tips. The tips are deep royal blue. This look works for everyone.
Royal Blue to White Mix
This style mixes royal blue with white. The white is usually at the bottom. Royal blue is at the tips. This creates a fresh, clean look. It works well in summer.
Royal Blue to Black Blend
This is a bold choice. The nails start with royal blue. They get darker toward black at the tips. This style looks dramatic. It works well for night events.
Sparkle Royal Blue Ombre
This style adds glitter or sparkles. The base color is still royal blue ombre. The sparkles make it shine more. This works great for parties or special days.
Royal Blue to Silver Style
This combines blue with silver. The silver can be metallic polish or glitter. It creates a modern, shiny look. This style photographs very well.
Step-by-Step Tutorial: How to Create Royal Blue Ombre Nails
What You Need:
- Base coat polish
- Light blue nail polish
- Medium blue nail polish
- Dark royal blue polish
- Clear top coat
- Small makeup sponge
- Nail file
- Cotton swabs
- Nail polish remover
- Cuticle oil
Getting Ready:
- Wash your hands with soap
- Remove old nail polish completely
- Cut nails to the length you want
- File nails into your favorite shape
- Push back your cuticles gently
- Clean nails with rubbing alcohol
Making the Ombre:
1: Base Layer
- Put on base coat polish
- Let it dry for two minutes
- Make sure it covers the whole nail
- Do not rush this step
2: Color Setup
- Put light blue on one side of the sponge
- Put royal blue on the other side
- Let the colors touch a little in the middle
- The sponge should have both colors
3: Apply Colors
- Press the sponge gently on your nail
- Start at the bottom and roll to the tip
- Do this three or four times
- Let each layer dry a little between coats
4: Clean Up
- Remove extra polish from your skin
- Use a small brush with polish remover
- Be careful around the nail edges
- Take your time with this step
5: Finish
- Apply clear top coat
- Let everything dry completely
- Add cuticle oil around your nails
- Admire your beautiful Royal Blue Ombre Nails
Professional Techniques for Royal Blue Ombre Nails
Sponge Method
The sponge way is best for beginners. It gives smooth color changes. You can control how dark or light you want the colors.
Sponge Tips:
- Use a clean sponge for each nail
- Press gently, do not rub hard
- Work fast before polish dries
- Build colors slowly with thin layers
- Practice on paper first
Brush Method
Some people use brushes instead of sponges. This takes more skill. But it gives you more control over the colors.
Brush Steps:
- Put base color on the whole nail
- Add darker color while base is wet
- Blend quickly with brush strokes
- Work from bottom to top
- Clean brush often while working
Gel Polish Option
Gel polish lasts longer than regular polish. It stays shiny for weeks. Many salons use gel for Royal Blue Nails.
Gel Benefits:
- Lasts two to three weeks
- Does not chip easily
- Colors stay bright longer
- Dries hard under special lights
- Gives very smooth finish
Royal Blue Ombre Nails for Different Occasions
Work and Office
For work, keep Royal Blue Ombre Nails simple. Use lighter shades of blue. Keep nails shorter for typing. Choose matte top coat for a soft look.
- Light blue to medium blue gradient
- Short to medium nail length
- Clean, neat application
- Subtle shine or matte finish
- Professional appearance
Parties and Events
For special times, make Ombre Nails more dramatic. Use darker blues. Add sparkles or gems. Make nails longer if you want.
- Bold blue to very dark blue
- Longer nail length for impact
- Shiny, glossy finish
- Add sparkles or small gems
- Eye-catching design
Daily Wear
For everyday life, Royal Blue Ombre Nails should be easy to manage. Choose medium colors. Keep a good length for daily tasks.
- Medium blue gradient
- Comfortable nail length
- Durable top coat
- Easy to maintain
- Practical for daily activities
Maintenance and Care for Nails
Daily Care:
- Put oil on your cuticles each day
- Wear gloves when you clean
- Do not use nails to open things
- Keep hands soft with hand cream
- Be gentle with your nails
Weekly Care:
- Add fresh top coat once a week
- Push cuticles back gently
- File any rough spots right away
- Fix small chips quickly
- Massage hands with oil
Fixing Problems:
- Small chips: Use matching polish to fix
- Dull shine: Add new top coat
- Grown out cuticles: Clean up with small brush
- Faded color: Add more polish carefully
Color Combinations with Royal Blue Ombre Nails
Blue and Silver
This mix looks very elegant. The silver makes the blue look richer. It works well with silver jewelry. Many people choose this for weddings.
- Shiny, metallic look
- Goes with silver accessories
- Perfect for evening events
- Easy to create with metallic polish
Blue and Gold
Gold with royal blue looks rich and fancy. This combination works for fall and winter. It matches gold jewelry perfectly.
- Warm, luxury appearance
- Great for cold seasons
- Matches gold accessories
- Perfect for holiday parties
Blue and White
This is a fresh, clean look. It reminds people of the ocean or sky. This style works great in spring and summer.
- Clean, bright appearance
- Perfect for warm weather
- Easy to maintain
- Goes with casual outfits
Common Mistakes to Avoid
Application Problems:
- Never skip base coat – it protects your nails
- Do not rush – let each layer dry well
- Use thin coats, not thick ones
- Clean up messy edges
- Always finish with top coat
Color Problems:
- Pick colors that work together
- Use good quality nail polish
- Test colors together first
- Think about your skin tone
- Do not mix too many different brands
Care Problems:
- Protect nails when cleaning
- Keep cuticles soft and healthy
- Fix chips right away
- Use hand cream daily
- Do not pick at your nails
Royal Blue Ombre Nails Trends for 2025
New Styles This Year:
Soft Matte Look
Many people want matte Royal Blue Ombre Nails now. They look modern and soft. The finish is not shiny. This style works well for work.
Short and Simple
Short Royal Blue Ombre Nails are very popular. They are easy to manage. They look neat and clean. Perfect for busy people.
Mixed Textures
Some nails have both shiny and matte parts. This creates interesting effects. It makes Royal Blue Ombre Nails look more special.
Minimal Design
Less is more in 2025. Simple Royal Blue Ombre Nails with clean lines are trending. No extra decorations needed.
Tools and Products for Royal Blue Ombre Nails
Basic Supplies:
- Good royal blue nail polish
- Light blue or white polish
- Strong base coat
- Clear top coat that lasts
- Soft makeup sponge
- Small cleanup brush
Extra Tools:
- Nail file for shaping
- Buffer for smooth nails
- Cuticle pusher tool
- Hand cream for soft skin
- Cuticle oil for healthy nails
For Gel Polish:
- UV or LED nail light
- Gel base coat
- Gel royal blue colors
- Gel top coat
- Special gel cleanser
Troubleshooting Royal Blue Ombre Nails
Streaky Look:
This happens when colors do not blend well. To fix this, use a damp sponge. Work with thin layers of polish. Blend while the polish is still wet.
Muddy Colors:
Sometimes colors mix too much and look muddy. Clean your sponge often. Work quickly. Use colors that work well together.
Uneven Color:
If one nail looks different, build up the color slowly. Add thin layers until all nails match. Take your time with this.
Chips Too Soon:
Always use base coat and top coat. Let each layer dry completely. Avoid water for two hours after finishing.
Royal Blue Ombre Nails for Different Nail Shapes
Round Nails:
Round nails work great with Royal Blue Ombre Nails. The curve follows the gradient nicely. This shape is easy to maintain. It looks natural and pretty.
Square Nails:
Square nails give a modern look. The straight edges show off the color change well. This shape is strong and does not break easily.
Pointed Nails:
Pointed nails look very elegant with royal blue ombre. The long shape makes fingers look longer. This style needs more care but looks amazing.
Short Nails:
Short Royal Blue Ombre Nails are practical and cute. They work well for people who use their hands a lot. Easy to manage every day.
Seasonal Variations of Royal Blue Ombre Nails
Spring Ideas:
- Light blue to royal blue gradient
- Add small flower designs
- Use glossy finish for spring shine
- Keep nails medium length
- Fresh, clean appearance
Summer Looks:
- Bright royal blue with white tips
- Add beach-theme small details
- Use long-lasting formula for vacations
- Bold, fun colors that photograph well
- Perfect for summer clothes
Fall Options:
- Deep blue with gold accents
- Rich, warm color combinations
- Matte finish for cozy fall look
- Darker shades for autumn fashion
- Perfect with fall outfit colors
Winter Styles:
- Very dark royal blue gradients
- Add silver sparkles for holidays
- Long-lasting for winter parties
- Elegant, formal appearance
- Perfect for cold weather outfits
Conclusion
Royal Blue Ombre Nails are beautiful and timeless. They work for many different people and events. You can make them at home easily. The best thing about Royal Blue Nails is how versatile they are. Simple or fancy, they always look good. Start with basic designs first. Take care of your nails properly and they will last long. Practice makes perfect with this nail style. Royal Blue Ombre Nails will always stay popular and elegant.